Exposing GKE services through Anthos Service Mesh with a managed HTTPS load balancer
Using a microservices architecture comes with great benefits such as improved scalability, faster time to market, isolation of different components and increased agility to deal with change. It provides a solution for managing different versions of the same services, developers wanting A/B testing and increasing security requirements from management.
While this approach does increase complexity, using the right tooling to manage and control your services helps to facilitate the migration away from your monolith. My go-to solution for these kinds of complex setups is Kubernetes, which in most cases comes down to GKE for me because of its very rich set of features and ease of use.
When applications grow and more features are added, the number of services quickly increases. After a while you can find yourself managing hundreds or even thousands of objects that all interconnect somehow.
Building and maintaining such a setup yourself would require either a lot of manual configuration or building custom scripts to automate certain tasks. Getting cold sweats just thinking about the hassle? No worries, there is a solution to deal with those requirements.
I’m talking about a service mesh. A layer that you place on top of the services that takes the complexity away from the underlying setup. The application only needs to handle it’s core function, the rest is handled by the mesh. When we talk about a service mesh, we have to talk about Istio which is one of the most widely used solutions.
Istio and GKE
This article isn’t about Istio itself so I won’t go into detail. Here are a couple of resources to get you started on what Istio is:
GKE has had an Istio add-on for a couple of years now, which did the trick by installing all components in your cluster and letting you manage the setup. This required deep knowledge of Istio’s services by anyone maintaining the cluster. Running all of the Istio workloads in-cluster means sacrificing some resources to host the control plane yourself.
With Istio support for GKE being deprecated an alternative emerged: the Anthos managed service. Anthos is Google’s hybrid cloud management solution. Google decided to drop support for Istio in favor of Anthos Service Mesh.
Anthos Service Mesh (ASM)
ASM is a managed service mesh built with Istio. The Istio control plane is offloaded to the managed service , the managed data plane is optional (and in preview at moment of writing). The result is the same functionality you have with Istio with a lot less components to manage yourself.
ASM comes with its own GCP dashboard that helps visualize how your services are interlinked. With this dashboard, you can define your own Service Level Indicators (SLIs) to connect them to Service Level Objectives (SLOs). Gain insight into how your services are performing. Once you know what to expect, you can set SLAs to provide your users with a data backed promise on uptime, availability or other. You can even configure custom alerts using GCP’s operations suite so you know when your app is in trouble or when your error budget is almost depleted.
If you’re looking for a good resource on how to define and set SLOs, I suggest the free SRE e-book from Google:
Use case: Building an ASM on a single GKE cluster
Let’s get to it. In the next part I will go over the installation and configuration of a fully functional service mesh architecture with the following requirements:
- every service must be able to have its separate mesh ingress configuration to allow for the most flexible setup
- HTTPS load balancing must be used for SSL/TLS offloading using GCP managed certificates, global routing, health checking, …
- TLS encryption must be guaranteed to each service backend
If you want to follow along, here’s what you will need:
- a GKE cluster (Kubernetes version 1.20 or 1.21 for this version of ASM). Check out the cluster requirements. Note: I will be using a private GKE cluster for increased security
- e2-standard-4 GKE nodes or similar (at least 4 vCPUs)
- one or more k8s services to expose through the mesh
- Name the k8s services you want to expose according to this naming convention
- knowledge of Kubernetes objects such as deployments, k8s services, ingress, configmaps and secrets, …
- basic knowledge of Istio and it’s components such as pilot, ingress gateway, virtual services, …
ASM installation
Since ASM 1.11 (released Oct 6 2021) Google has made the asmcli install script generally available. This makes the install process more automated and a lot less error prone. You can either use the --enable-all flag to automatically set everything up or specify each install option manually.
Running the asmcli script will enable all required API’s, set the appropriate IAM roles and configure the components of the service mesh.
Anthos uses the concepts of fleets to organize clusters. In order to use the service mesh, a fleet will be configured. In our use case, the fleet will consist of one cluster. More information on fleets here
Installation
In order to run the asmcli script you need:
- a Linux box with administrative access to your cluster
- the asmcli script itself. I will use version 1.11
- The required tools to run the script
- a serviceaccount that has the required IAM roles to run the script with
To install ASM and enable all of the components use this command:
./asmcli install --project_id <GCP-project> \
--cluster_name <GKE-cluster> \
--cluster_location <region> \
--output_dir <path_to_output_dir> \
--enable-all
Again, using the --enable-all flag will install all the GCP components needed, enable the required API’s and create the k8s roles and rolebindings.
Validation
After we install everything, we can check if all the components were installed correcly using the validate subcommand.
./asmcli validate --project_id <GCP-project> \
--cluster_name <GKE-cluster> \
--cluster_location <region> \
--output_dir <path_to_output_dir>
The validate script provides very clear feedback if it runs into any error. Make sure the validation runs without errors before continuing. You don’t want to be left with a partial install.
If you are using a private cluster like me, you will need to open some additional firewall ports to your cluster.
If everything went well, the installation is complete and you will see a new deployment in your cluster named istiod-asm with two Cluster-IP services attached.

This is Istio’s pilot and the core of your service mesh.
After a couple of minutes, you will see that the Anthos Service Mesh Dashboard is available for your project. Go to https://console.cloud.google.com/anthos in your project to check it out. There won’t be much to see right now until we expose services through here but it’s a good check to see if everything is up-and-running.
Your GKE cluster should now also have some additional labels:
- asmv: 1–11–2-asm-17 (version of asm installed)
- mesh_id: proj-xxxx
The asmv label is one we will be needing further down the road so write this down if you’re following along.
Istio configuration
Now that we have all necessary components in place to start using our service mesh, let’s first check how we can analyze and manage our installation.
When running the asmcli install script, one of the options was --output-dir. This directory contains not only the installation logs but also some tooling like istioctl, kpt, … istioctl uses the kubeconfig so make sure you are connected to the correct cluster. Check with kubectl config current-context
Some istioctl commands to get you started:
$ ./istioctl version
client version: 1.11.2-asm.17
control plane version: 1.11.2-asm.17
data plane version: none
Notice how the data plane version is currently none. This is because we don’t have any sidecar proxies added to our services just yet.
$ ./istioctl analyze --all-namespacesThis is one the best commands to troubleshoot your istio configuration. If you executed this while following along with this article you might see these kind of messages:
Warning [IST0103] (Pod PODNAME) The pod is missing the Istio proxy. This can often be resolved by restarting or redeploying the workload.Which makes sense since this is a clean install, we will fix this in a bit.
Info [IST0102] (Namespace NAMESPACE) The namespace is not enabled for Istio injection. Run 'kubectl label namespace NAMESPACE istio-injection=enabled' to enable it, or 'kubectl label namespace NAMESPACE istio-injection=disabled' to explicitly mark it as not needing injection.Both messages essentially mean the same thing: istio-proxies are missing from the services and the namespaces won’t inject them because there is no label telling them to.
Istio sidecar proxy injection
To add an istio proxy to a workload you only need to add a label for the namespace it is running in. This label must match the asmv version on your cluster. Use this command to label the namespace(s), remove the istio-injection label and afterwards restart your deployments.
kubectl label namespace NAMESPACE istio-injection- istio.io/rev=REVISION --overwriteIn this case the revision would be:
istio.io/rev=asm-1112-17Perform a rolling restart to add the sidecar proxy to your deployments
kubectl rollout restart deployment -n NAMESPACEYou should now see an additional container in your workload, the istio-proxy. This proxy will communicate with Pilot (the istio-asm workload) and receive its configuration from there.
Work your way through the namespaces that need istio-injection or disable it for a namespace like this to eliminate the message from istioctl analyze:
kubectl label namespace NAMESPACE istio-injection=disabledTo check if communication between the sidecar proxies and pilot is working, issue the istioctl proxy-status command:
$ ./istioctl proxy-status
If all proxies are ‘SYNCED’ you’re good to go. Once the proxies are set up, you should see them appear in the GCP Anthos Service Mesh dashboard. But since the services have no ingress configuration, we won’t see any useful data for now because there is no traffic or load just yet.
Exposing services
Now it’s finally time to start routing traffic to our services.
This next part is somewhat special because most Istio deployments I’ve seen use a TCP load balancer for ingress traffic and put all the configuration like SSL and traffic routing in ingress gateways or even in the backend services.
We wanted to leverage the power of a managed HTTPS load balancer tightly integrated with a Kubernetes ingress object so all configuration would be handled by Kubernetes yaml without any manual intervention.
To clarify, this a conceptual schematic of the build:
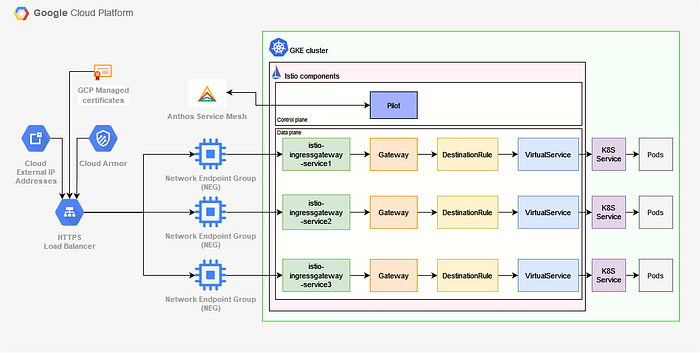
One HTTPS load balancer with multiple backends. These backends will be Network Endpoint Groups (NEGs) that point to a certain Istio ingress gateway for that service. Each ingress gateway leads to one or more Virtual Services in which we define each service’s behavior.
This design has multiple advantages:
- All public SSL/TLS certificates are GCP managed which means no additional services needed
- Each service has it own Istio ingress-gateway which results in the highest degree of flexibility we can achieve
- Full observability with monitoring metrics coming from the GLB, the Anthos Service Mesh, the Istio building blocks, GKE and finally the workloads themselves.
- Increased security with strict SSL/TLS profiles, Cloud Armor security policies, encryption guaranteed all the way down to the Kubernetes services
In the next few steps I will go through all of these objects needed to expose one service, the ‘app’-service, with ASM. First up: the ingress gateway!
Ingress gateway
Ingress gateways are envoy proxies that live on the edge of the mesh. They get their configuration from Istio pilot to route the traffic. There is no default ingress gateway when installing ASM with the asmcli script. This allows you to fully customize the ingress to your needs.
You can find some example configurations in your asmcli output directory under samples/gateways/istio-ingressgateway or on github. An ingress gateway consists of these parts:
- a deployment containing the istio-proxy
- a service that exposes the gateway. In our setup, this will be where the GCP load balancer connects to
- a serviceaccount, role and rolebinding
- an optional PodDisruptionBudget and a HorizontalPodAutoScaler
I’ve taken the sample configurations from github. Most changes were naming, except for the service.yaml. This is how my configuration looks like for the service object:
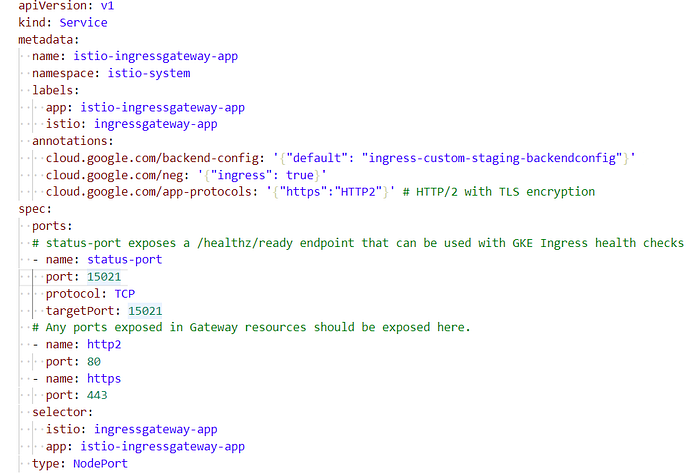
Note the three annotations starting with cloud.google.com. These go over these settings in depth.
BackendConfig
The cloud.google.com/backend-config annotation links this service to a BackendConfig object in my GKE cluster. This object defines how the service will be health checked and which Cloud Armor security policy will be used.
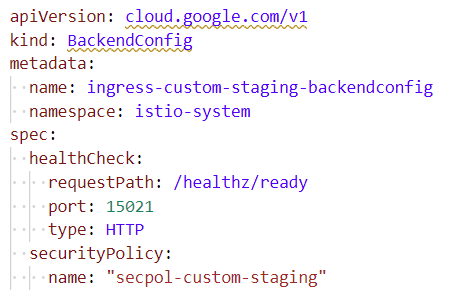
We defined a couple of BackendConfig objects which would use a predefined set of rules that govern who and what kind of traffic would be allowed inbound. We had a couple of different scenarios going from publicly available to a fixed list of clients with XSS and SQLi content checking.
By separating the ingress gateways for each service, we can then mix and match the services with the required BackendConfig to deal with all kinds of scenarios.
NEG ingress
The next annotation is cloud.google.com/neg: ‘{“ingress”: true}’. This tells the load balancer to use Network Endpoint Groups for Container Native Load Balancing.
App Protocols
Finally, we add the annotation cloud.google.com/app-protocols: ‘{“https”:”HTTP2"}’ to enable HTTP/2 with HTTPS to our service. This way we can ensure encryption to our backend, something we will configure later on.
Istio components
Now that we have an Ingress Gateway, let’s connect our Kubernetes backend service. For this example, I will stick to the app service we used earlier on. This is a service with no special Istio needs which means we can purely focus on the other configuration.
First, let’s define a gateway:
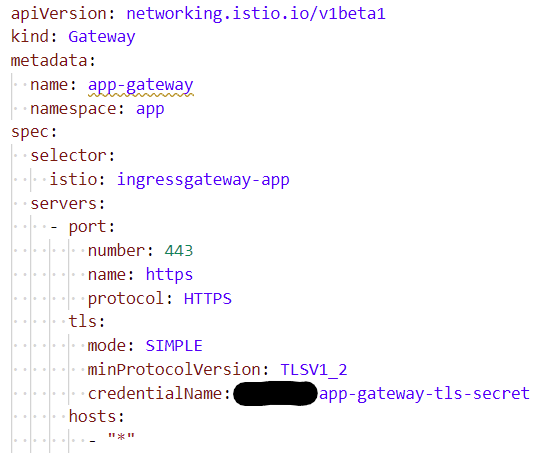
Here you can see a TLS section that points to a certificate, which is Kubernetes secret in the istio-system namespace. This is known as a secure Istio gateway that encrypts traffic until it reaches the right backend.
We define a DestinationRule to point to a Kubernetes service:
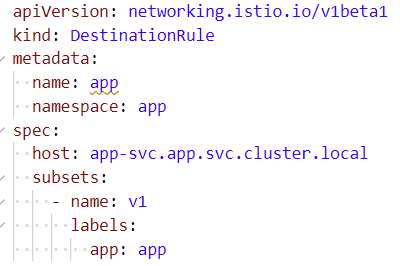
And finally a VirtualService which links everything together:

Note that it’s the VirtualService that connects to the gateway and not the other way around.
GCP HTTPS load balancer
The final piece of this puzzle is the load balancer. The configuration is done by defining a Kubernetes Ingress object so every setting of the GLB is controlled by Kubernetes. You can find a list of features that are currently supported here. Google has really put in the effort of adding new features over the last couple of years which makes this integration really powerful.
The ingress object must be in the same namespace of the ingress gateways, istio-system in this case.
The ingress yaml looks like this (stripped down version):

We can manipulate the load balancer’s GCP configuration with the annotations. With these we link to an reserved static IP, point to a FrontendConfig (below), attach managed GCP certificates and set the ingress class to create the right type of load balancer.
Finally, the configuration of the FrontendConfig:
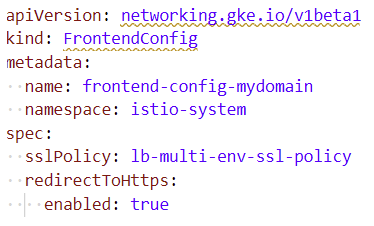
In this FrontendConfig we define the sslPolicy and do a redirect from HTTP to HTTPS. This last setting will create a second forwarding rule to redirect (HTTP 301) the traffic to the HTTPS rule.
Conclusion
This article is the result of a quest between what is technically possible and how to get the most feature rich setup without having to manage a lot of components ourselves. With ASM you gain insights into your application without needing to set up extra monitoring or visualization tools.
While the initial setup may take a bit longer, eliminating the need to manage and configure Istio’s core components makes the choice of implementing ASM an easy one for me.
Not to mention seeing all those graphs like request rates, latency, errors in the ASM dashboard helps us define the feature release rate when there’s still error budget left, or shift effort to more bug fixes if a service’s performance has degraded. Instead of using several tools and dashboards to monitor services, the ASM dashboard combines and aggregates the data so better decisions can be made.
Thanks for reading! Hope it was as fun to read as it was to write ;-)
If you ever want to chat on building awesome cloud stuff, ping us at www.vbridge.eu